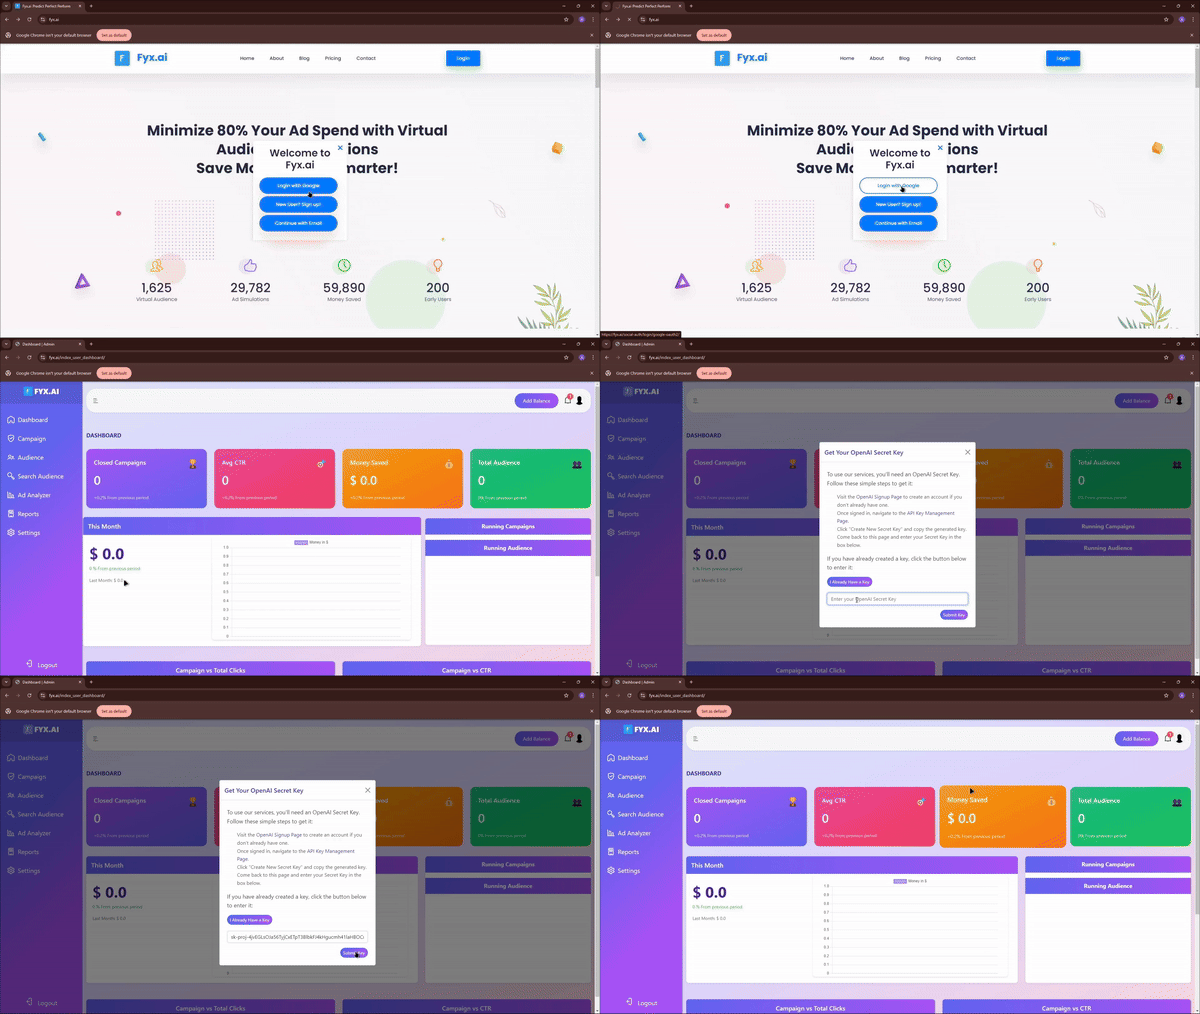
1. Setting Up Your OpenAI Key
- Log in to your FYX.ai account.
- There will be a POPUP on Dashboard.
- Select Already have a key and Enter your OpenAI API key.
- Click Submit to securely store the key.
- Once the key is saved, wait for a confirmation message indicating that the API key is active.
- Navigate to the Campaigns on the Dashboard to access campaign management tools.
- The Avg CTR card displays Money spent and recieved.
- The Money Saved card displays total amount of money saved through Fyx.ai.
- The Campaign vs Total Clicks graph displays Audience clicked on the respective campaign.
- The Campaign vs Ctr Graph display the amount of money saved through the campaign.
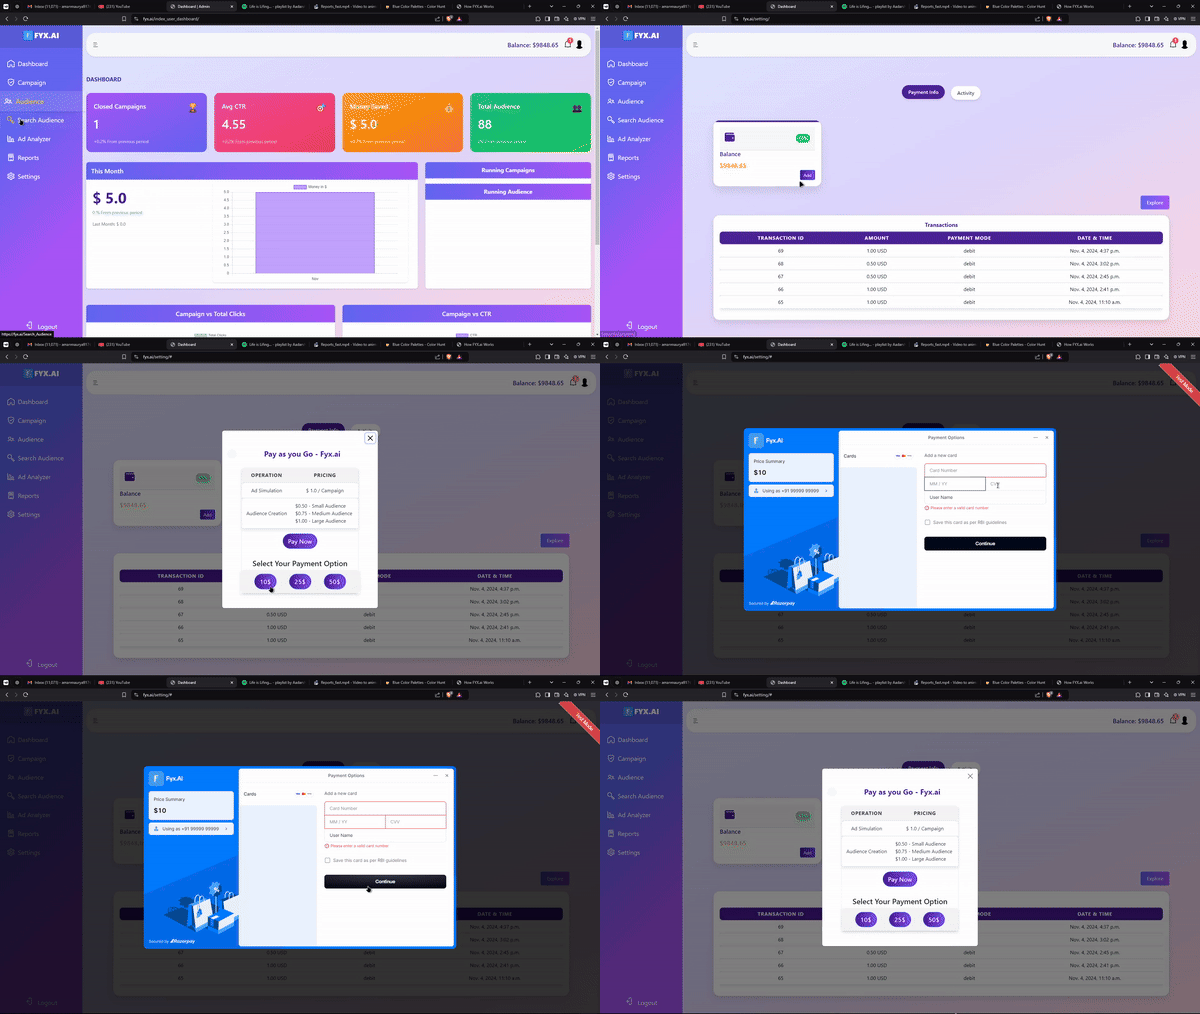
2. Adding Balance to Your Wallet
- Go to the Settings section in the dashboard.
- Click Add Balance.
- Choose your preferred payment method (credit card, PayPal, etc.).
- Enter the amount you wish to add and confirm the payment.
- After confirmation, a secure transaction processing message will appear.
- Once processed, the updated balance will reflect in your Balance Card instantly.
- You’ll receive a confirmation email with the transaction details for your records.
- To review your transaction history, go to the Billing or Transaction History tab in the Settings.
- Ensure your balance is sufficient to run campaigns and simulations based on your projected budget.
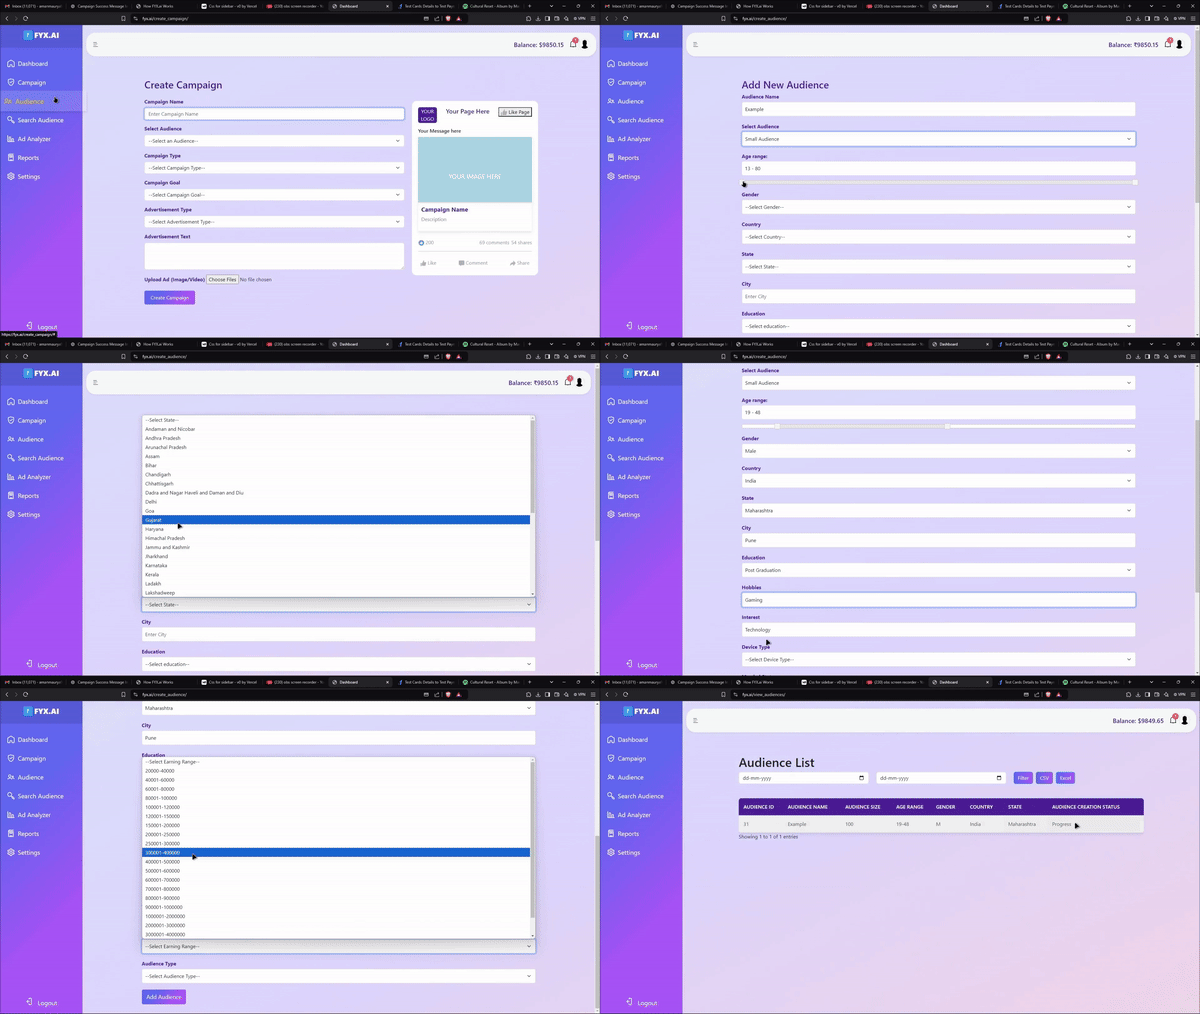
3. Creating an Audience
- From the dashboard, go to the Audience tab.
- Click Create Audience.
- Fill out the details, including demographics, interests, and custom criteria.
- Click Submit to save the audience.
- Once saved, go to the Audience List to view all saved audiences.
- Select the newly created audience to view detailed settings and metrics.
- To edit any information, click Edit Audience and make necessary adjustments.
- Click Save Changes to update the audience profile.
- For advanced targeting, add behavioral data or historical interactions if available.
- Return to the Campaigns tab and choose the saved audience for your ad simulations.
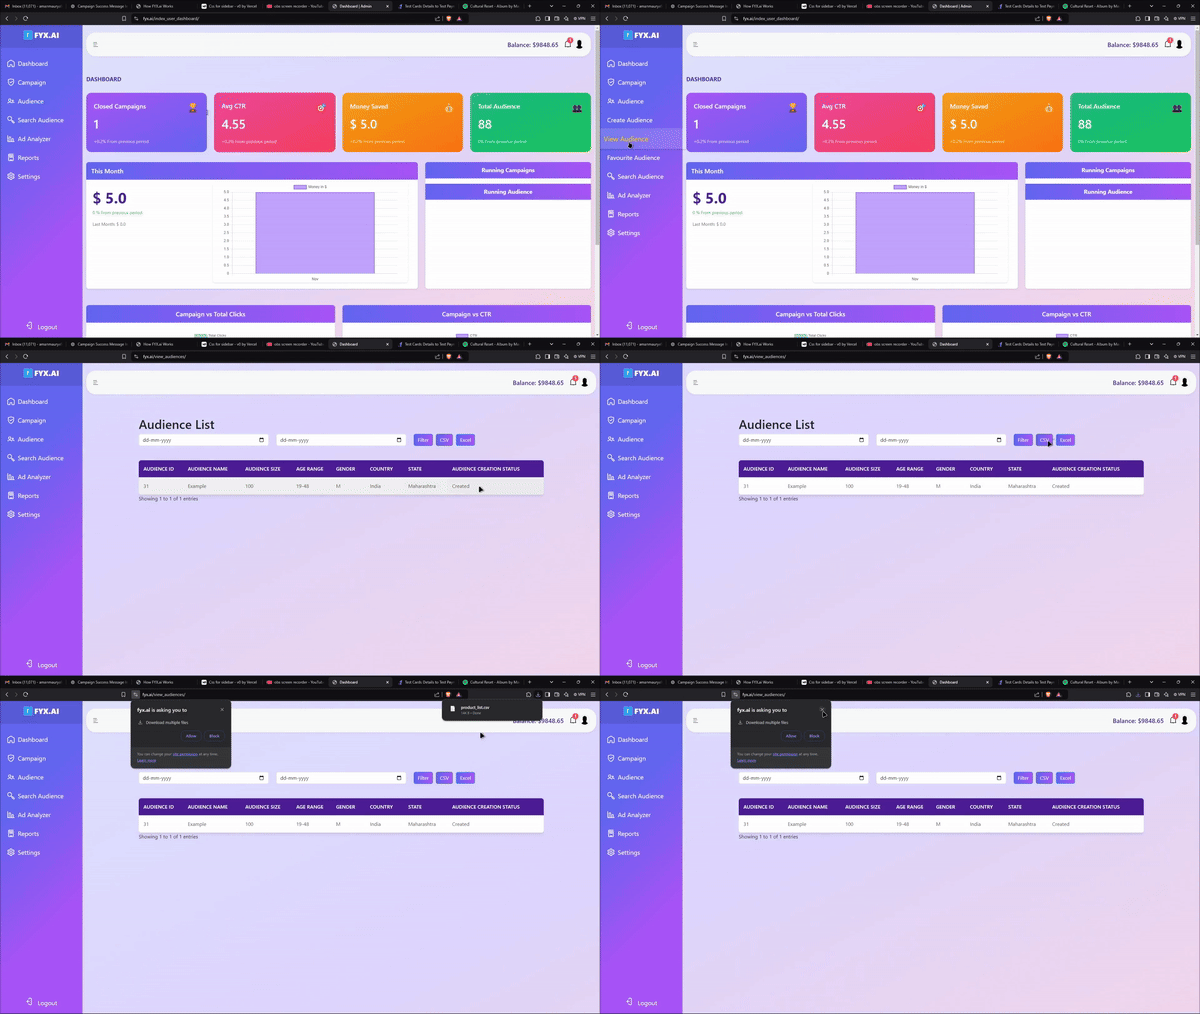
4. Viewing Audiences
- Navigate to the Audience tab.
- Click View Audiences to see a list of all created audiences.
- Search or filter based on specific criteria.
- Click on an audience name to view detailed information about that audience.
- Review the demographics, interests, and any custom criteria associated with the selected audience.
- To make updates, click Edit Audience and adjust the necessary fields.
- Click Save Changes to apply your updates to the audience.
- If you need to duplicate this audience, click Duplicate and rename the new copy.
- To delete an audience, click Delete and confirm your choice.
- Return to the Campaigns tab to use any audience for targeting in your ad simulations.
5. Creating a Campaign
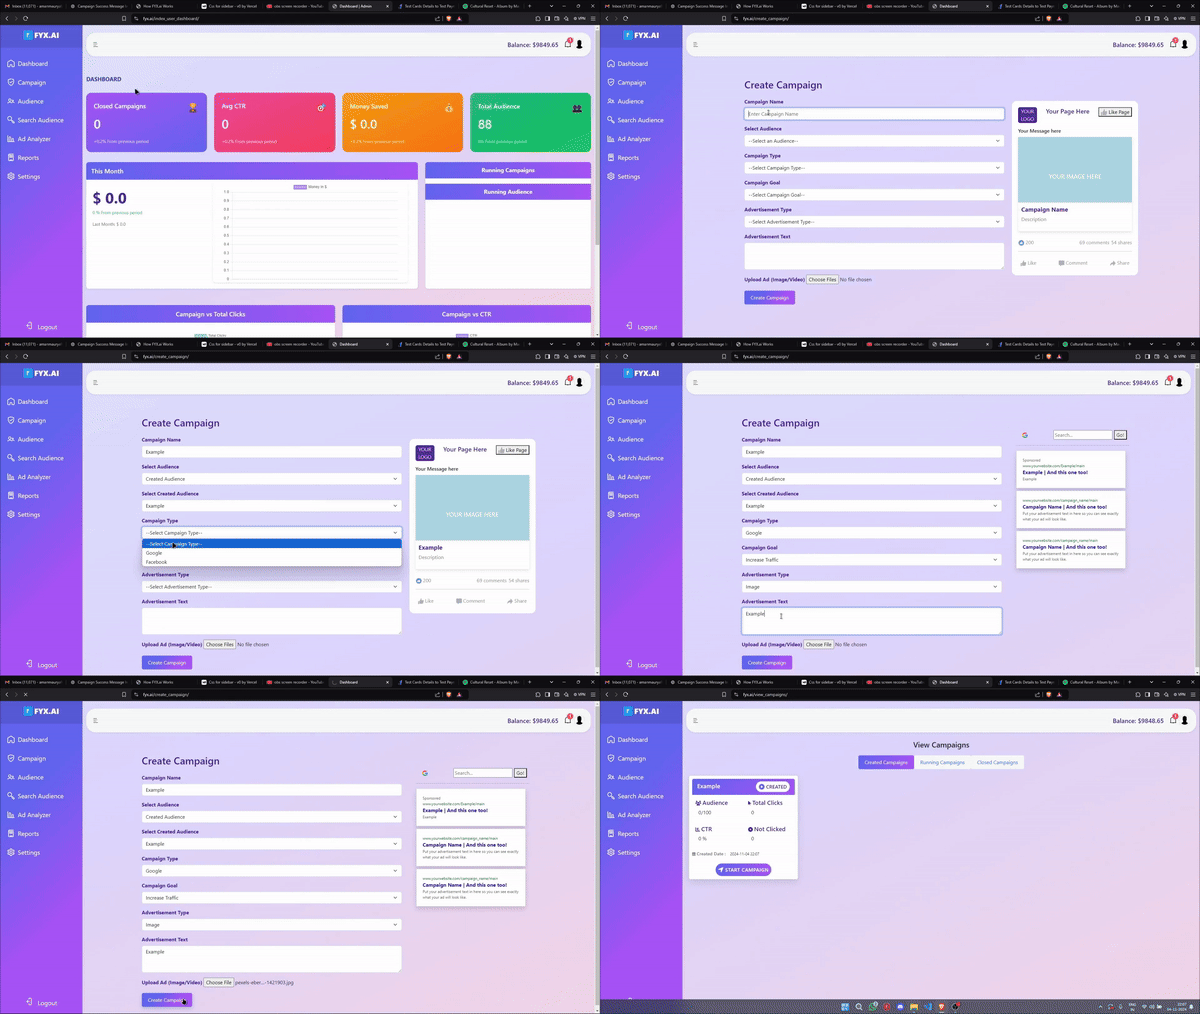
- Go to the Campaigns tab.
- Click Create Campaign.
- Set the campaign parameters, such as name, audience, budget, and content.
- Define the campaign duration by selecting start and end dates.
- Choose the campaign objective (e.g., awareness, engagement, conversions) to guide simulation goals.
- Customize ad formats (such as images, videos, or carousel) based on your content strategy.
- Add specific keywords or tags to improve targeting accuracy.
- Review all campaign settings to ensure accuracy.
- Click Launch to start the campaign.
- Monitor campaign progress in the Campaign Dashboard for real-time performance updates.
- Adjust settings as needed based on early feedback or results to optimize performance.
6. Viewing Campaign
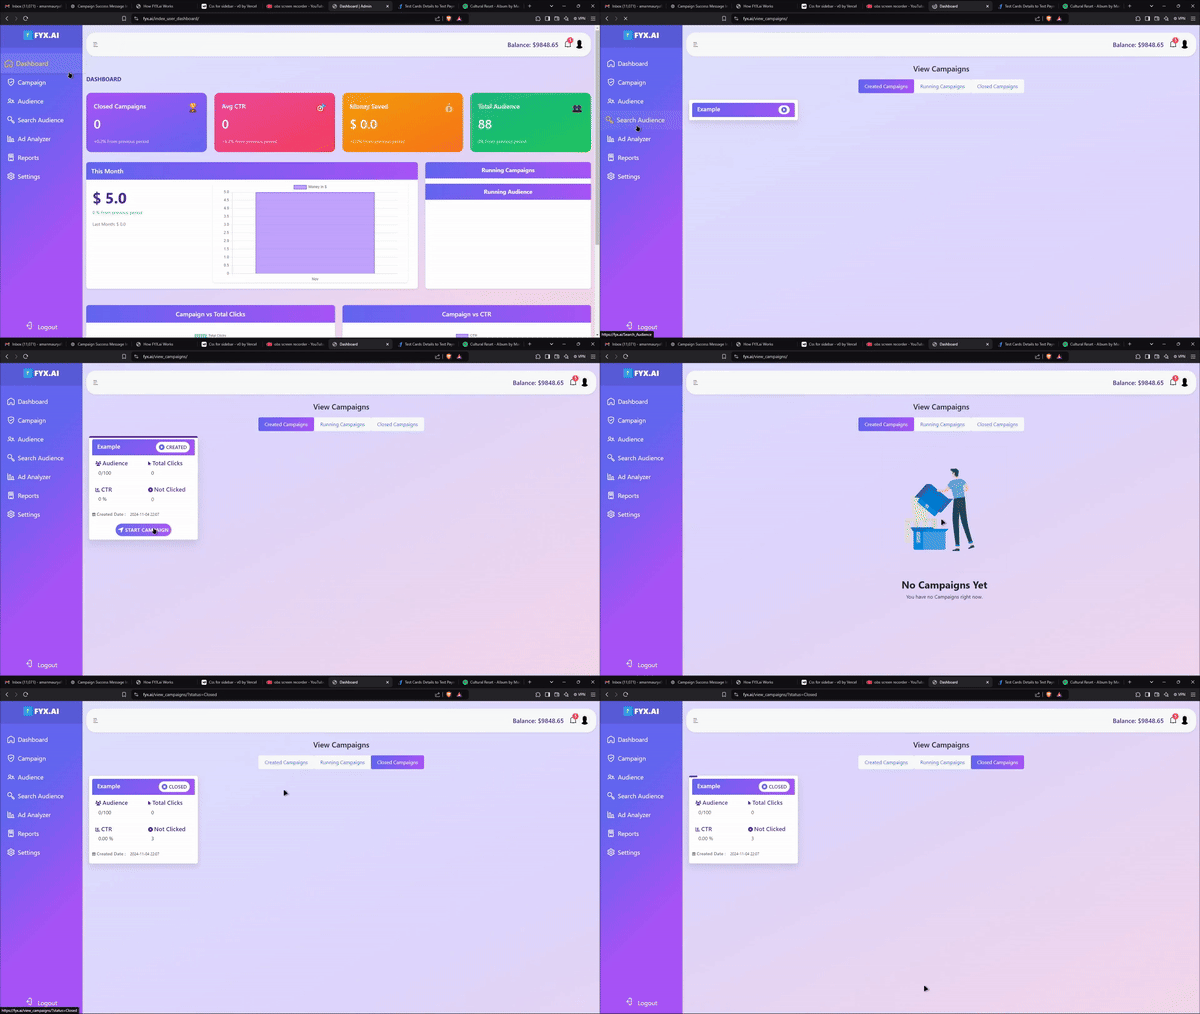
- Go to the Campaigns tab.
- Click View Campaigns to see a list of all created campaigns.
- Select a campaign to view its detailed performance metrics.
- In the campaign details page, review metrics such as reach, engagement rate, conversion rate, and cost-per-click (CPC).
- Analyze audience insights to see which demographics are responding best to the campaign.
- Check the Trend Analysis section for performance over time.
- Download a report of the campaign’s performance metrics by clicking Export Report.
- Return to the main Campaigns tab to monitor other campaigns or create new ones.
7. Search an Audience
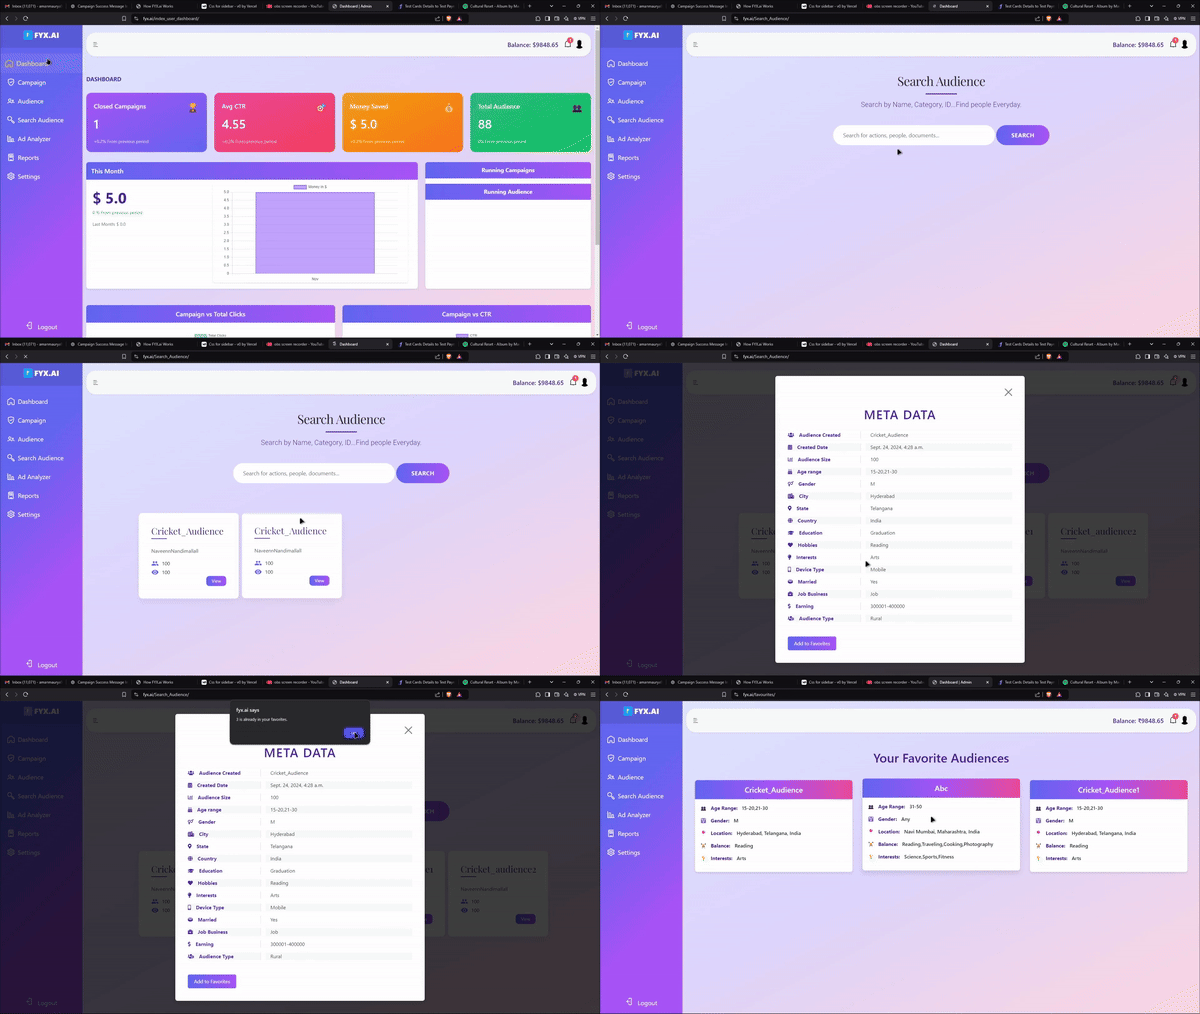
- Head over to the Audience section.
- Use the Search Bar at the top of the page to filter through audiences by name, demographic, or keyword.
- Click the View button next to an audience to see all its metadata, including demographics, interests, and engagement history.
- Review the audience's performance metrics, such as reach, engagement rates, and conversion potential.
- If this audience is frequently used, click Add To Favorites for faster access in the future.
- Favorite audiences will be saved in a separate section, accessible from the Favorites tab within the Audience section.
- To remove an audience from favorites, click Remove from Favorites in the audience's detail view.
- Return to the main Audience list by clicking Back or using the breadcrumb navigation at the top of the page.
8. Manual Audience
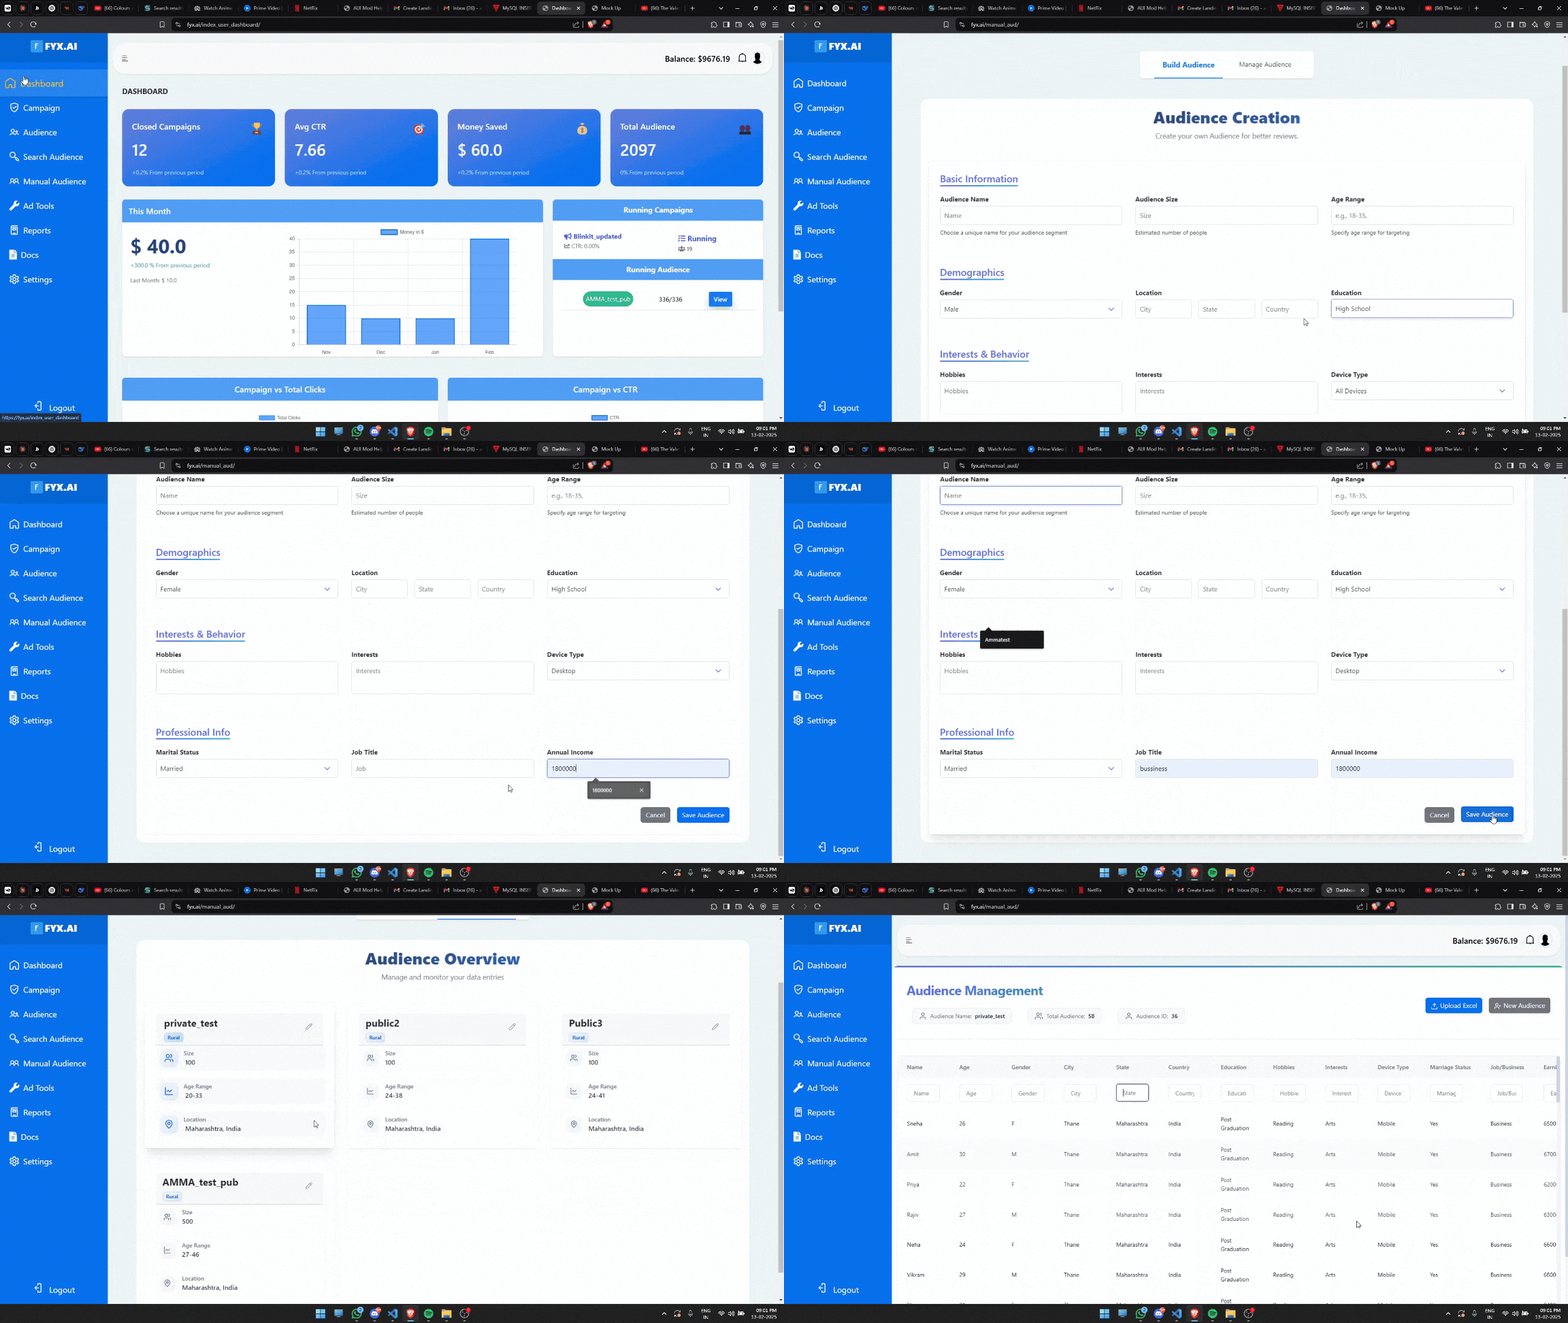
- Navigate to the Manual Audience section.
- Click Build Audience to start building a custom audience.
- Enter a name for your audience to easily identify it later.
- Select key demographics such as age, gender, location, and language.
- Choose audience interests and behaviors relevant to your campaign.
- Click Save Audience to store it for future campaigns.
- To edit an existing manual audience, select it from the list and click Edit.
- To delete an audience, click Remove in the audience details view.
- Return to the main Audience list to create or manage additional audiences.
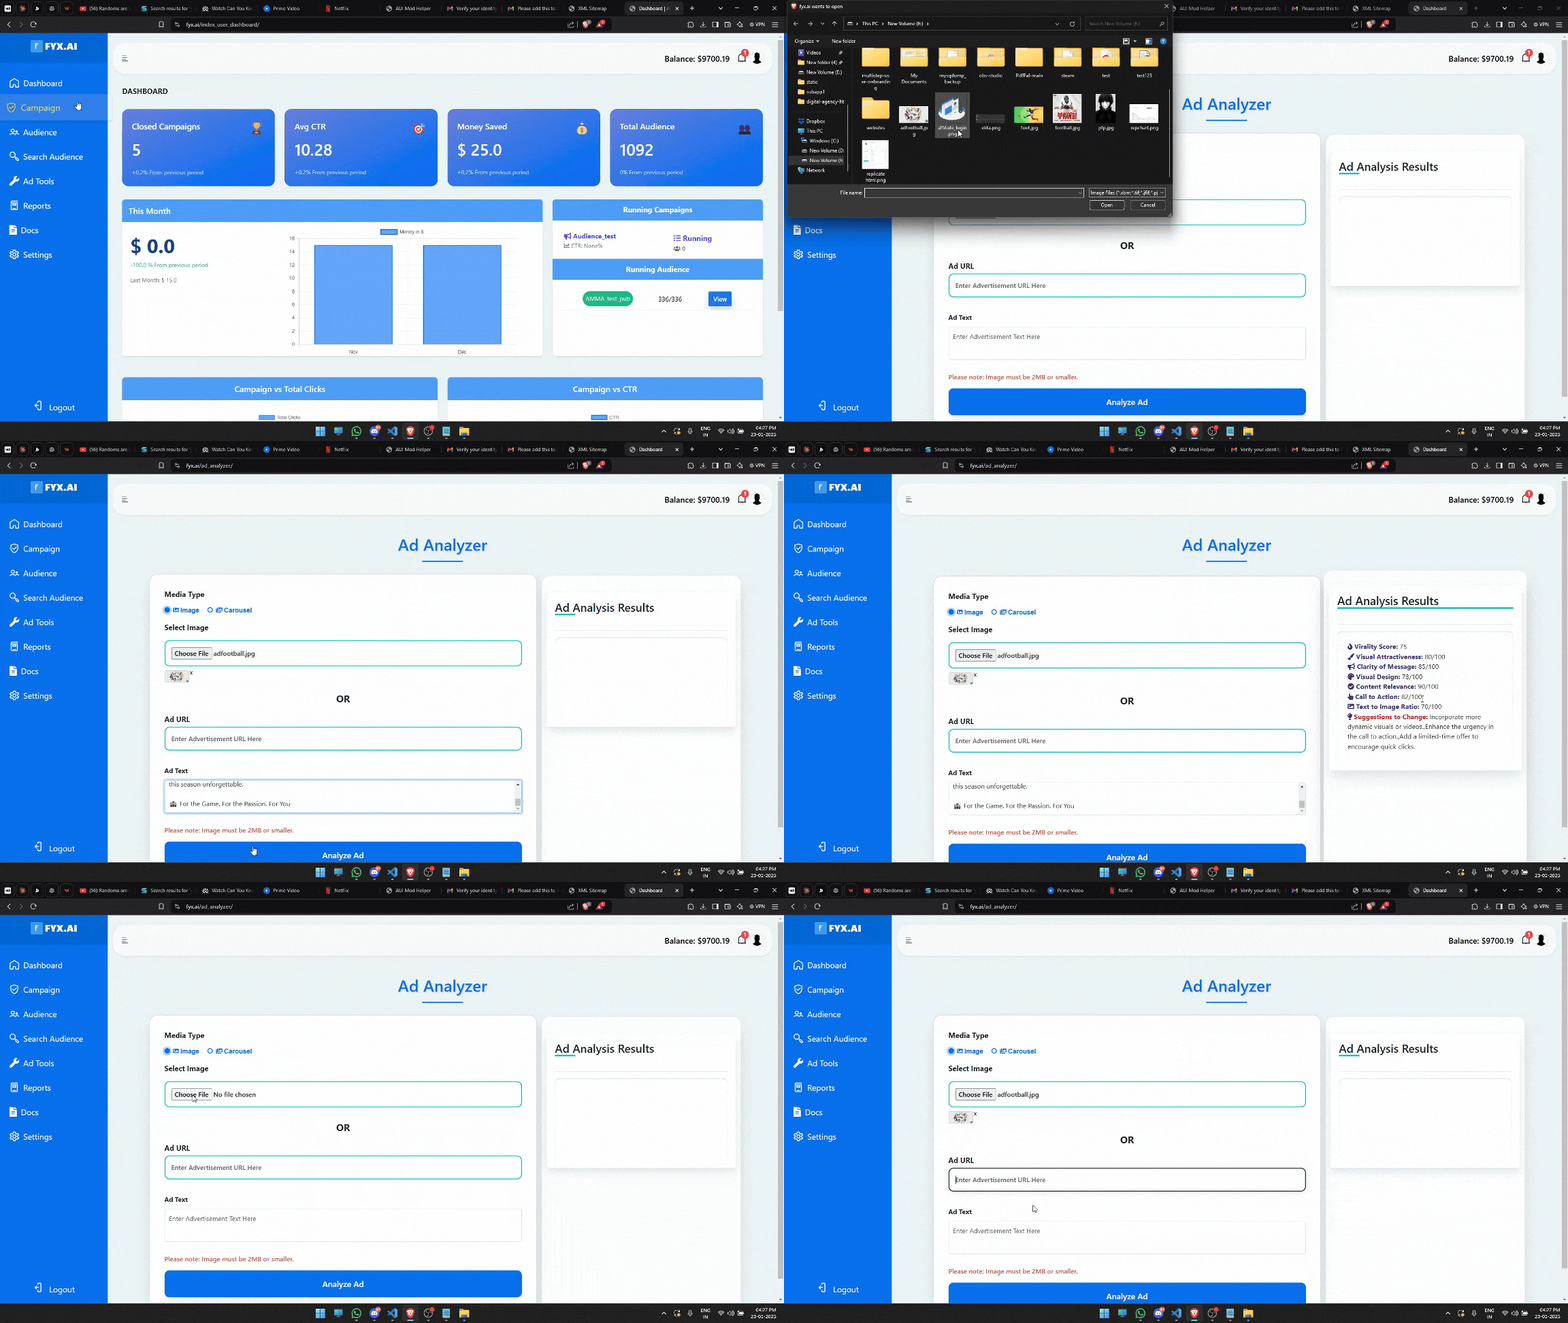
9. Ad Analyzer
- Navigate to the Ad Analyzer tab.
- Click Add Image or URL and provide a description for the ad.
- Select the Target Audience you intend to reach with this ad.
- Choose the ad format (e.g., image, video, carousel) for more tailored insights.
- Click Analyze to initiate the AI-powered review.
- The AI will generate a quick analysis, highlighting strengths, weaknesses, and potential improvements for your ad.
- Review metrics such as predicted engagement rate, clarity of messaging, and visual appeal.
- Scroll down to view specific suggestions on enhancing audience engagement, such as adjusting colors, text placement, or call-to-action.
- Return to the main Ad Analyzer tab to analyze additional ads or compare performance insights.
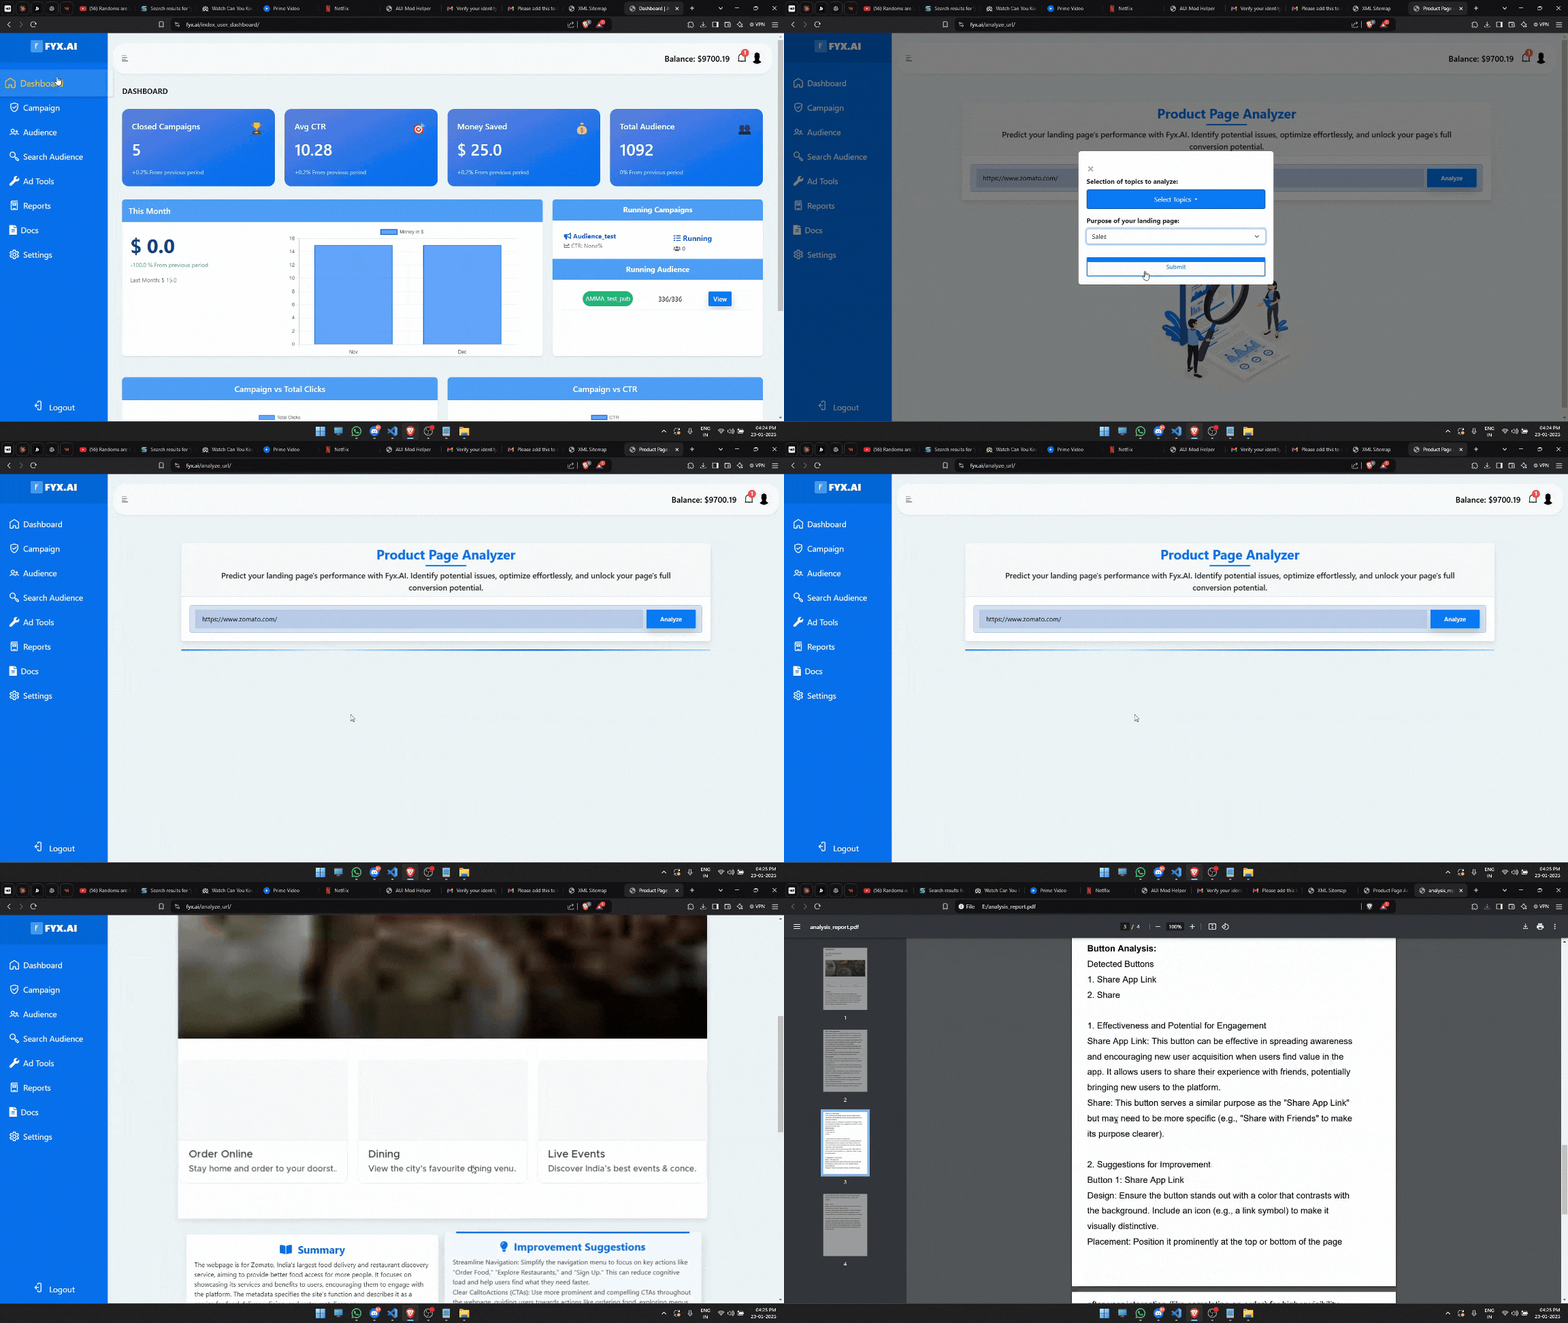
10. Product Page Analyzer
- Navigate to the Product Page Analyzer tab.
- Click Add URL and enter the link to the product page you want to analyze.
- Provide a brief description of the product and its intended audience.
- Select key elements to analyze, such as Performance, Seo, and call-to-action.
- Click Analyze to initiate the AI-powered review.
- The AI will generate an analysis, highlighting strengths, weaknesses, and areas for optimization.
- Review insights on factors like user engagement, clarity of messaging, SEO effectiveness, and conversion potential.
- Scroll down to view specific recommendations, such as improving product descriptions, optimizing images, or enhancing CTA visibility.
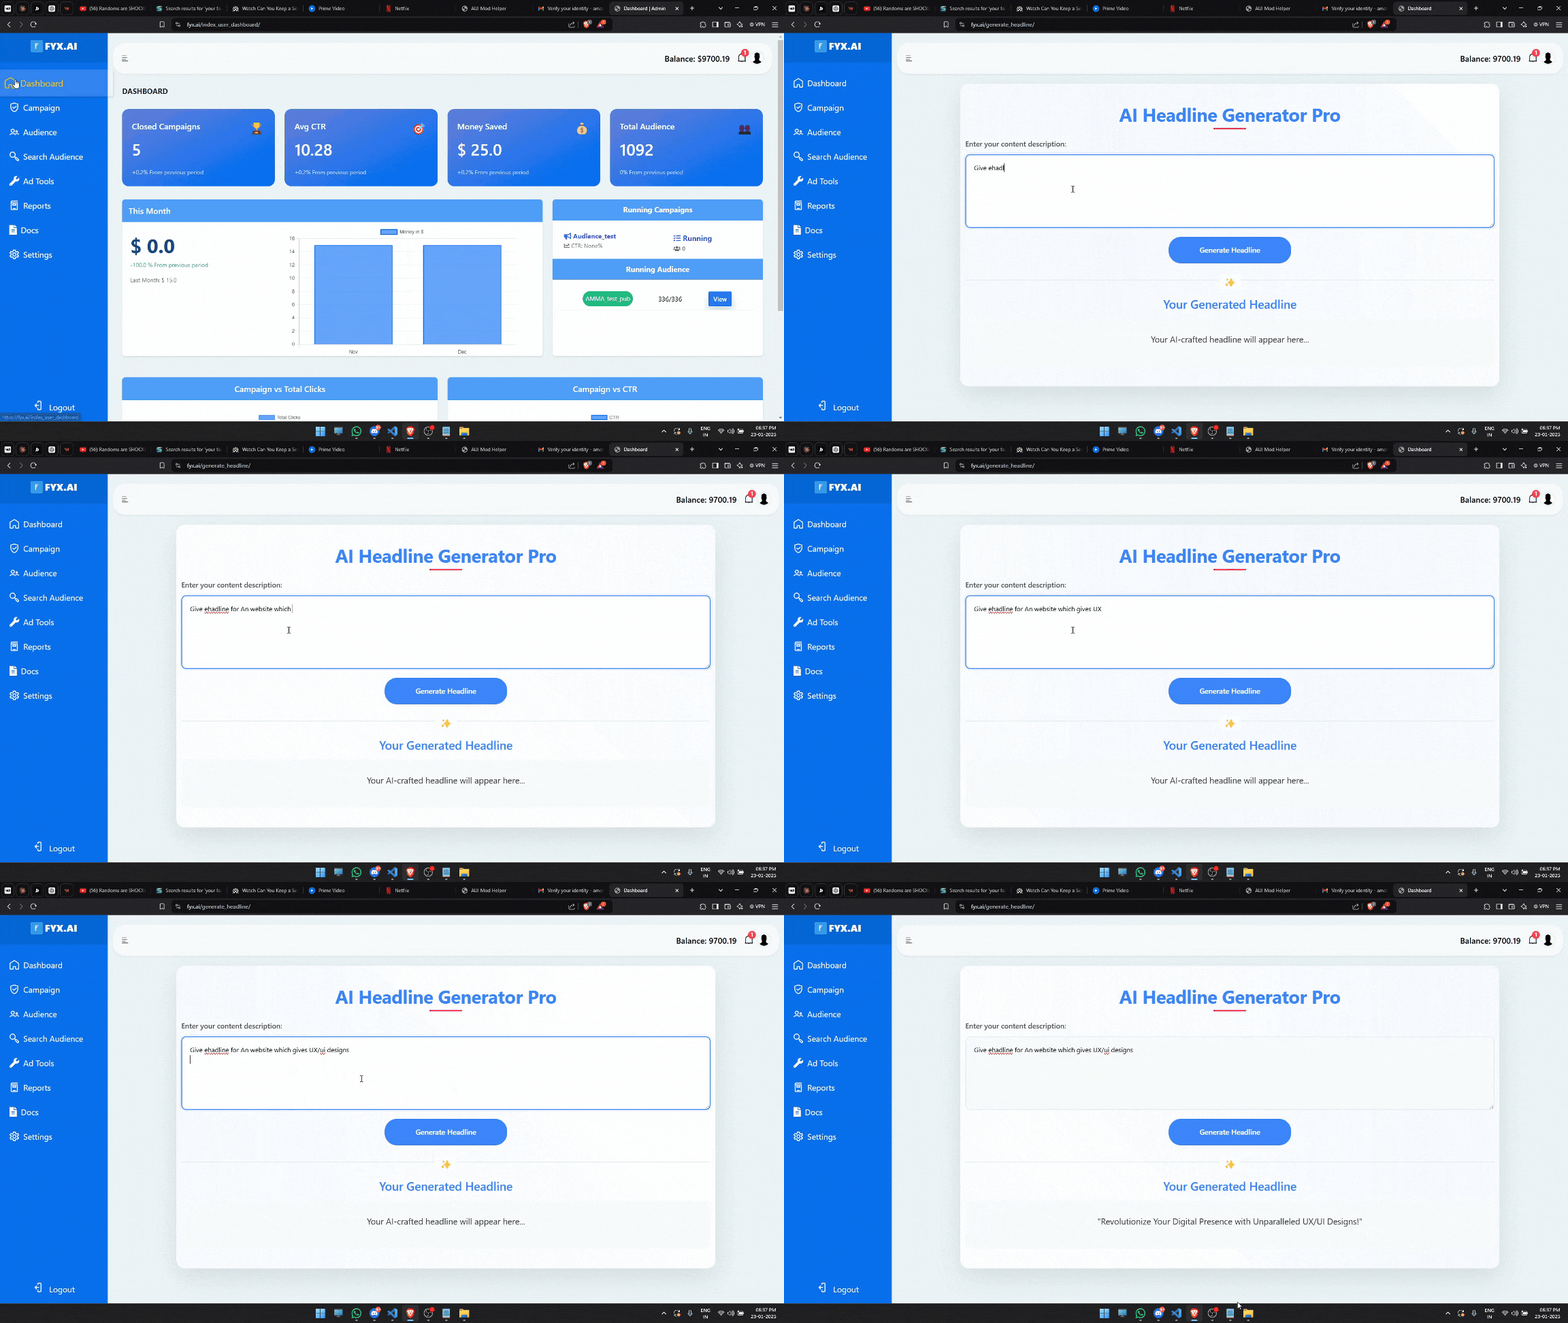
11. AI Headline Generator Pro
- Navigate to the AI Headline Generator tab.
- Click Enter Keywords and provide relevant words or phrases related to your content.
- Select the desired tone and style (e.g., persuasive, informative, catchy).
- Click Generate to let the AI create high-impact headlines.
- The AI will provide multiple headline variations, ranked based on engagement potential.
- Review key metrics such as emotional appeal, clarity, and SEO effectiveness.
- Scroll down to view improvement suggestions, including keyword optimization and word balance.
- Return to the main AI Headline Generator tab to generate more headlines or refine results.
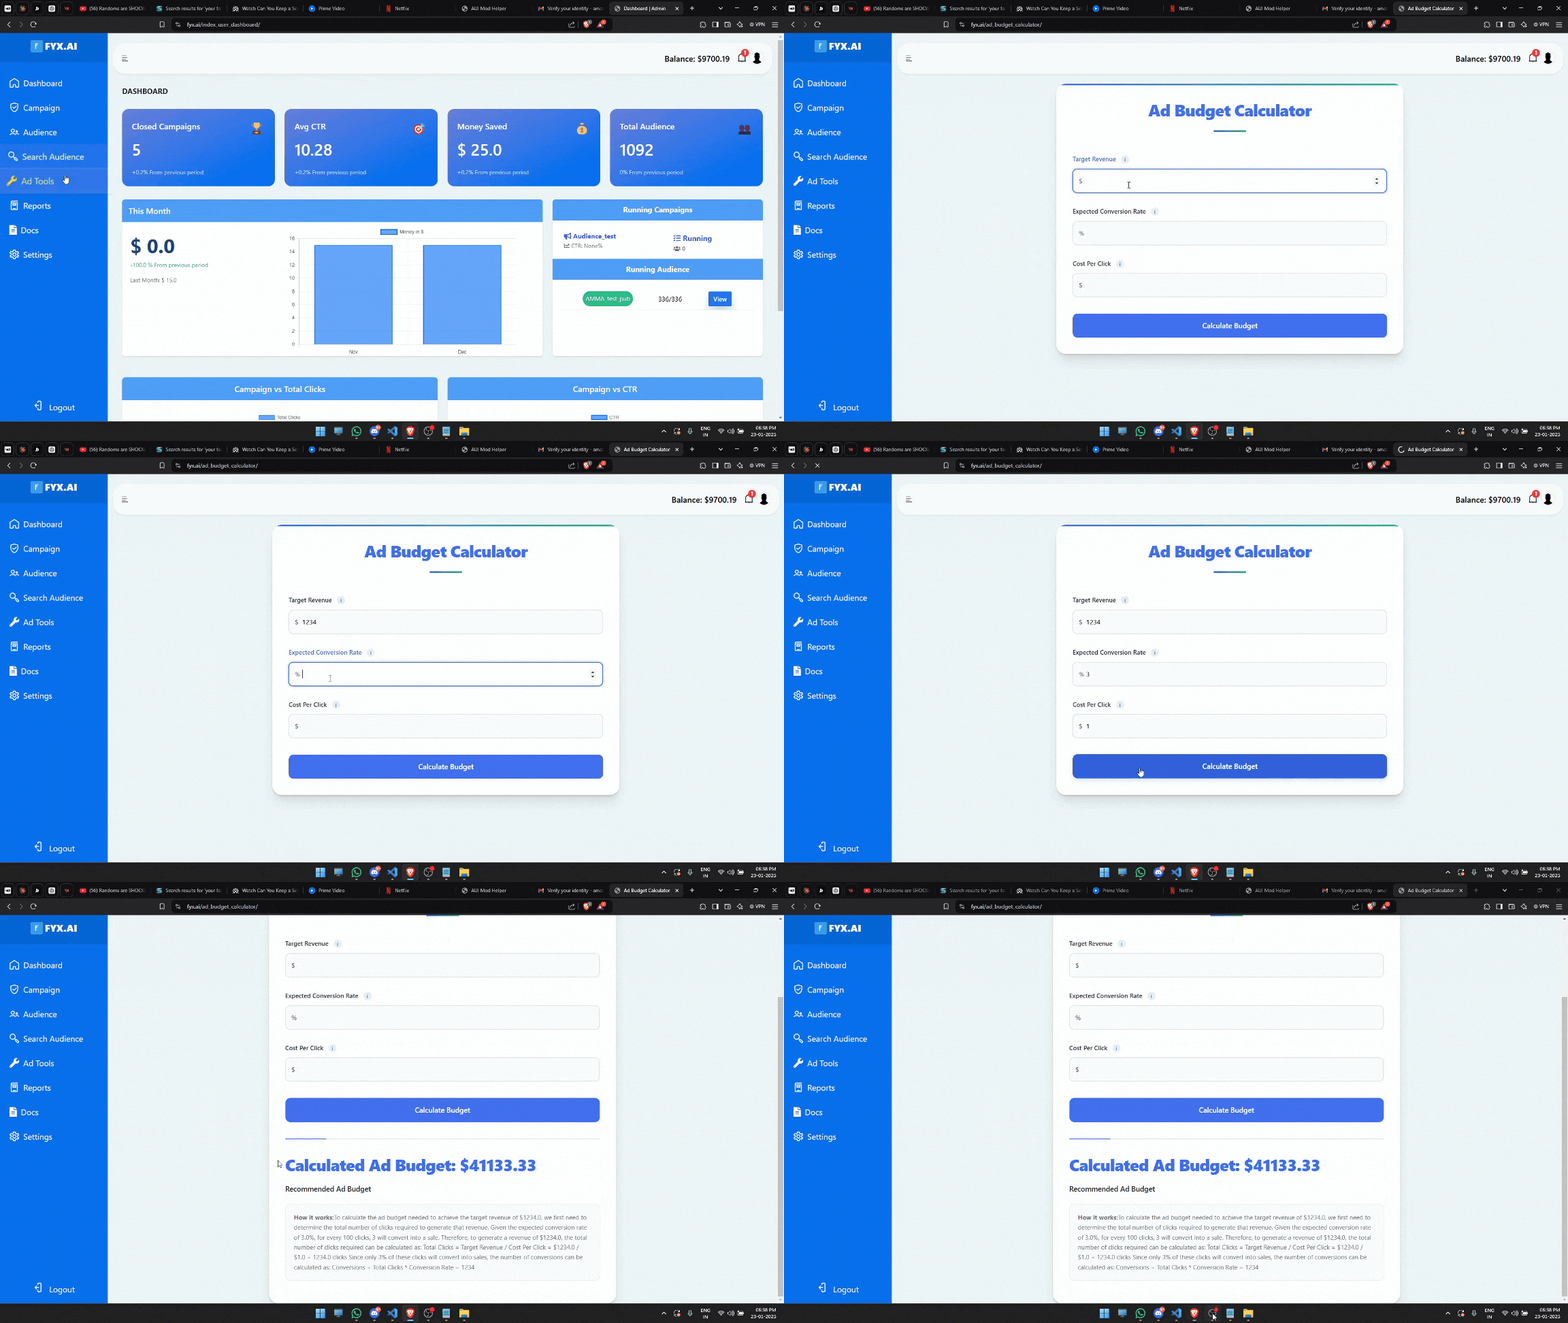
12. Ad Budget Calculator
- Navigate to the Ad Budget Calculator tab.
- Input your desired reach or engagement goals.
- Click Calculate to generate an AI-powered budget estimate.
- The AI will provide a recommended budget range based on industry benchmarks and projected performance.
- Review key metrics such as estimated cost per click (CPC), cost per acquisition (CPA), and return on ad spend (ROAS).
- Scroll down to explore budget optimization tips, including adjustments for audience targeting and bid strategies.
- Return to the main Ad Budget Calculator tab to refine your inputs or compare different budget scenarios.
13. ROAS Calculator
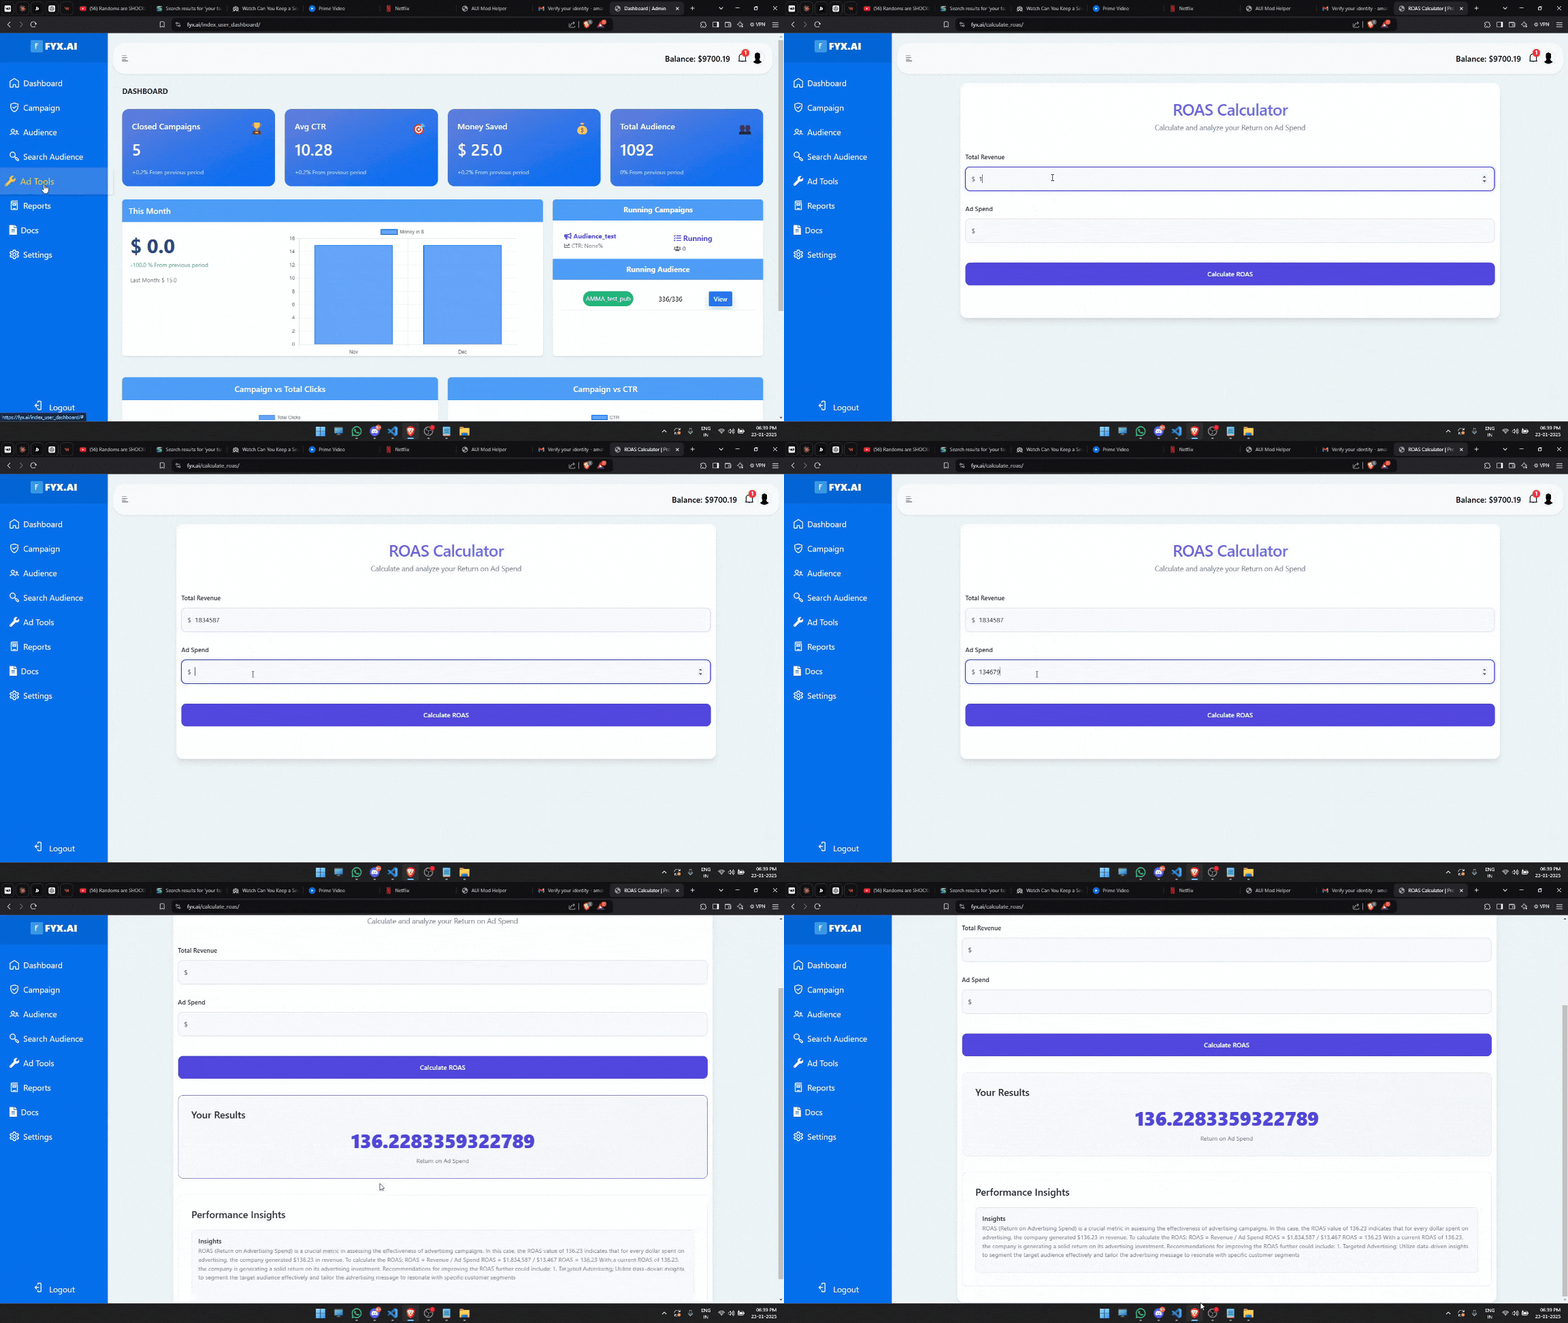
- Navigate to the ROAS Calculator tab.
- Click Enter Campaign Data and input details such as total ad spend and revenue generated.
- Specify the advertising platform or campaign type for more precise insights.
- Click Calculate to generate your Return on Ad Spend (ROAS).
- The AI will compute your ROAS and categorize performance (e.g., profitable, break-even, or underperforming).
- Review key metrics such as revenue per dollar spent, cost per acquisition (CPA), and conversion efficiency.
- Scroll down to explore optimization suggestions, such as adjusting ad spend, refining targeting, or improving creatives.
- Return to the main ROAS Calculator tab to analyze additional campaigns or compare performance trends.
14. Ad Performance Analyzer
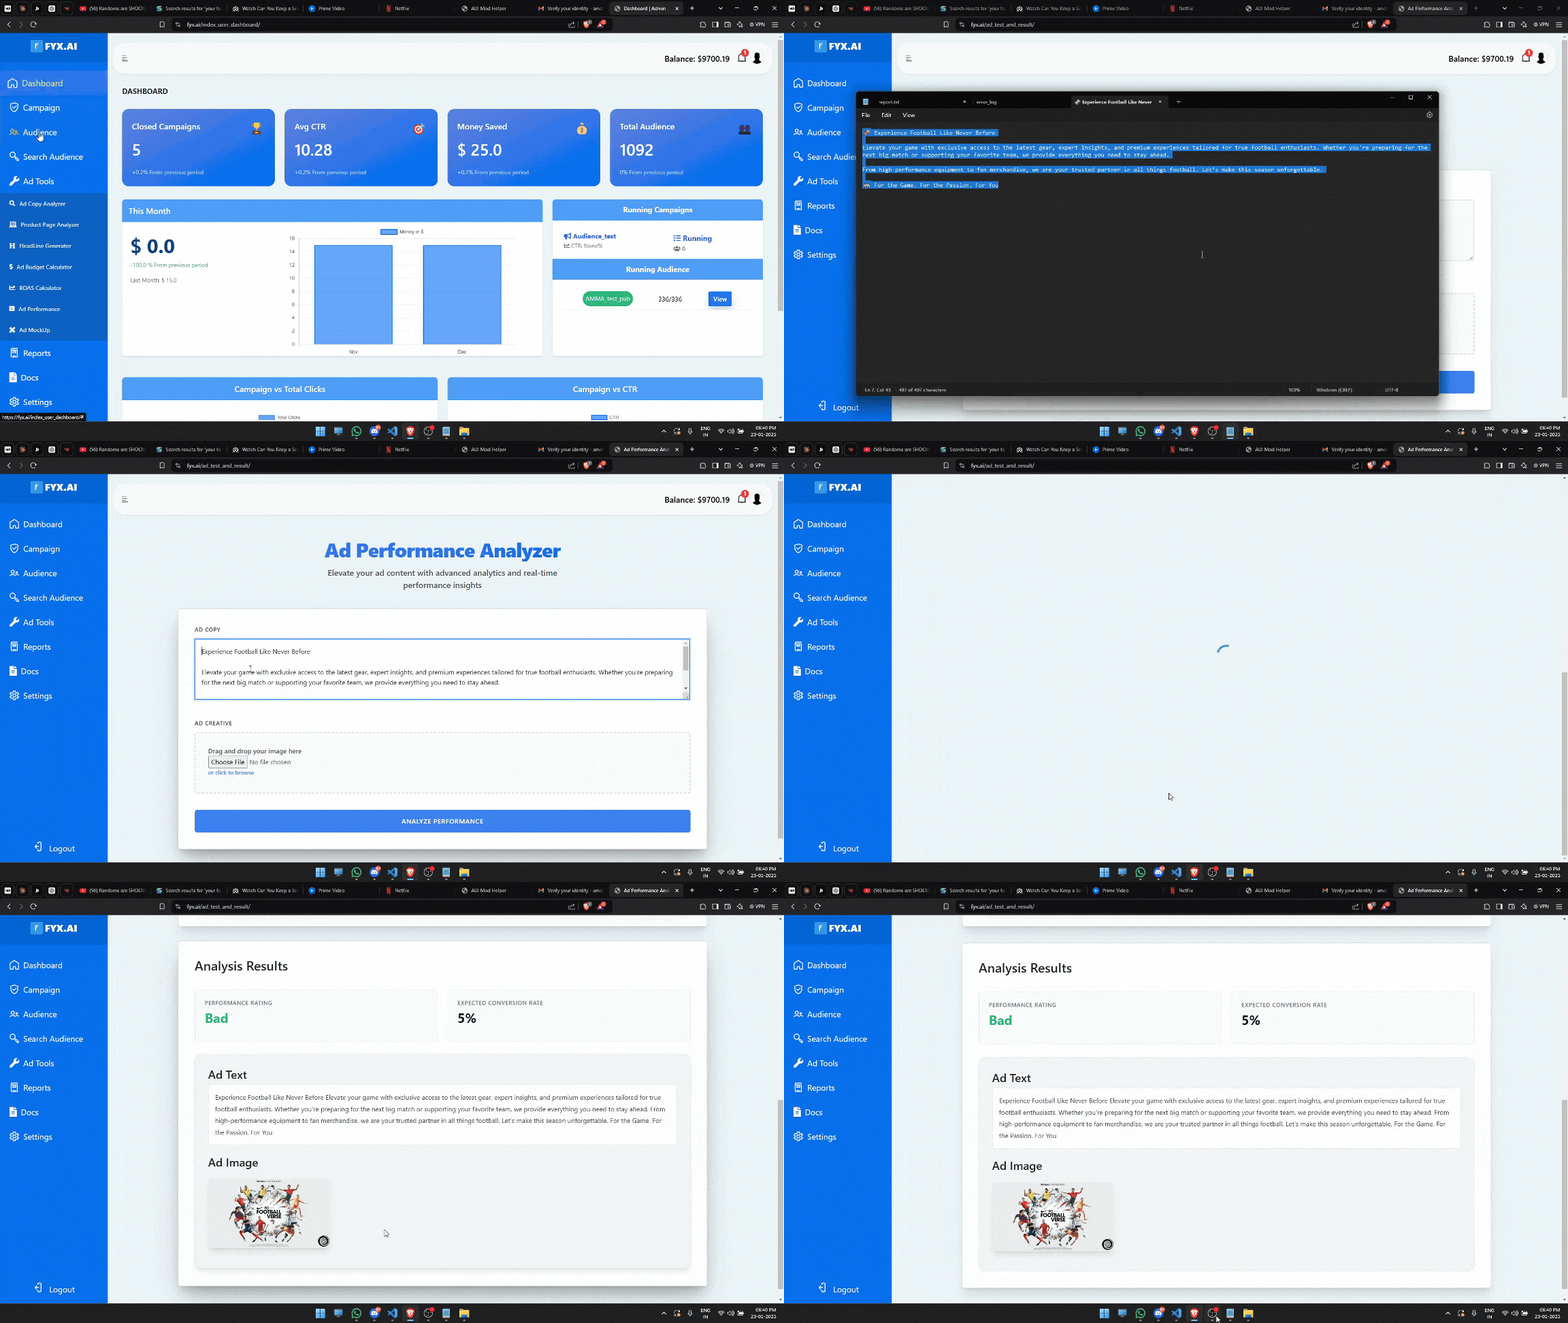
- Navigate to the Ad Performance Analyzer tab.
- Click Upload Ad Data to import campaign insights.
- Select the ad campaign you want to analyze.
- Click Analyze to generate AI-powered performance insights.
- The AI will assess key metrics such as click-through rate (CTR), conversion rate, and engagement levels.
- Review performance breakdowns, including audience behavior, ad placement efficiency, and cost-effectiveness.
- Scroll down to view actionable recommendations, such as refining targeting, optimizing ad creatives, or adjusting bidding strategies.
- Compare past and current campaign performance to track improvements over time.
- Return to the main Ad Performance Analyzer tab to analyze additional campaigns or refine strategy.
15. Facebook Ad Mockup
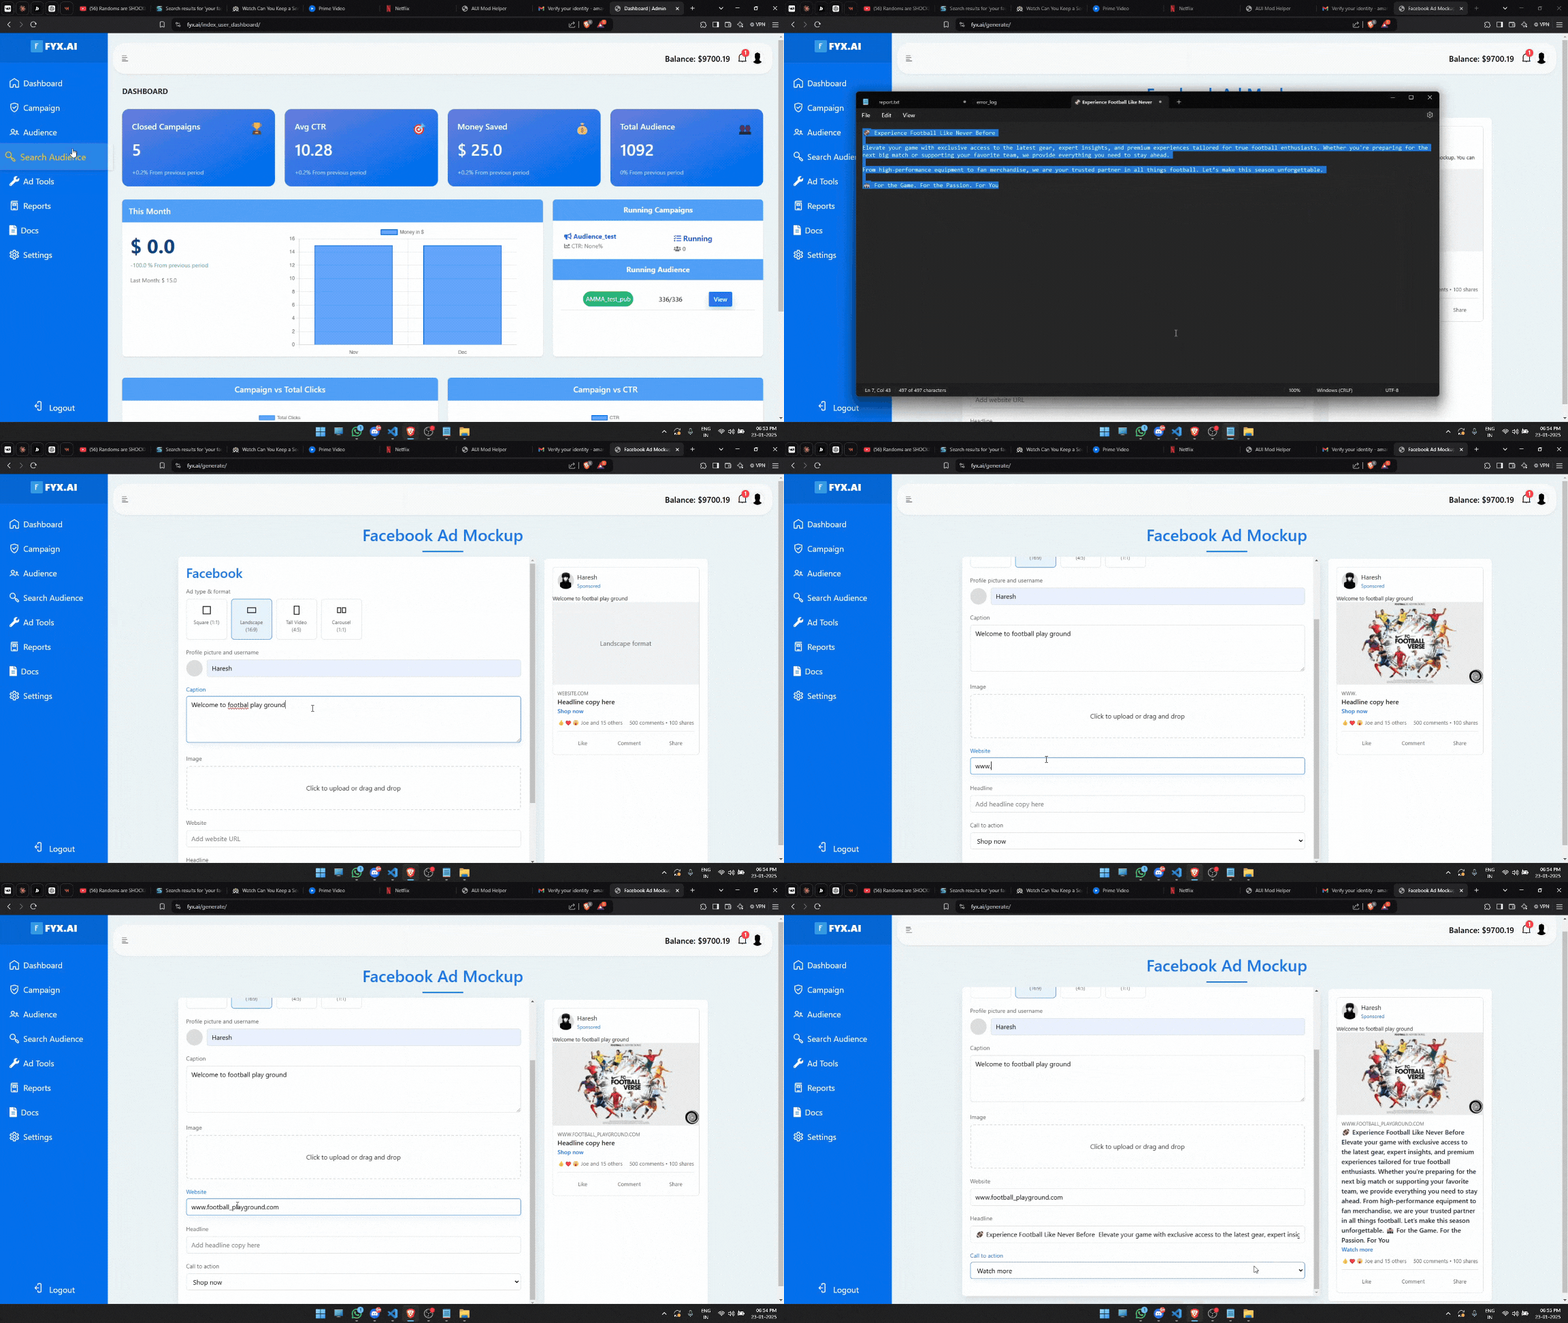
- Navigate to the Facebook Ad Mockup tab.
- Click Create New Mockup and select your desired ad format (e.g., image, video, carousel).
- Upload your ad creatives or select from available templates.
- Enter ad copy, headline, and call-to-action text.
- Customize placement options, such as Facebook Feed, Stories, or Marketplace.
- Click Preview to generate a live mockup of your ad.
- Review AI-powered insights on engagement potential, readability, and visual appeal.
- Make adjustments based on recommendations for optimal performance.
- Download or share the mockup for team collaboration and final approvals.
- Return to the main Facebook Ad Mockup tab to create additional variations or test different creatives.
16. Reports
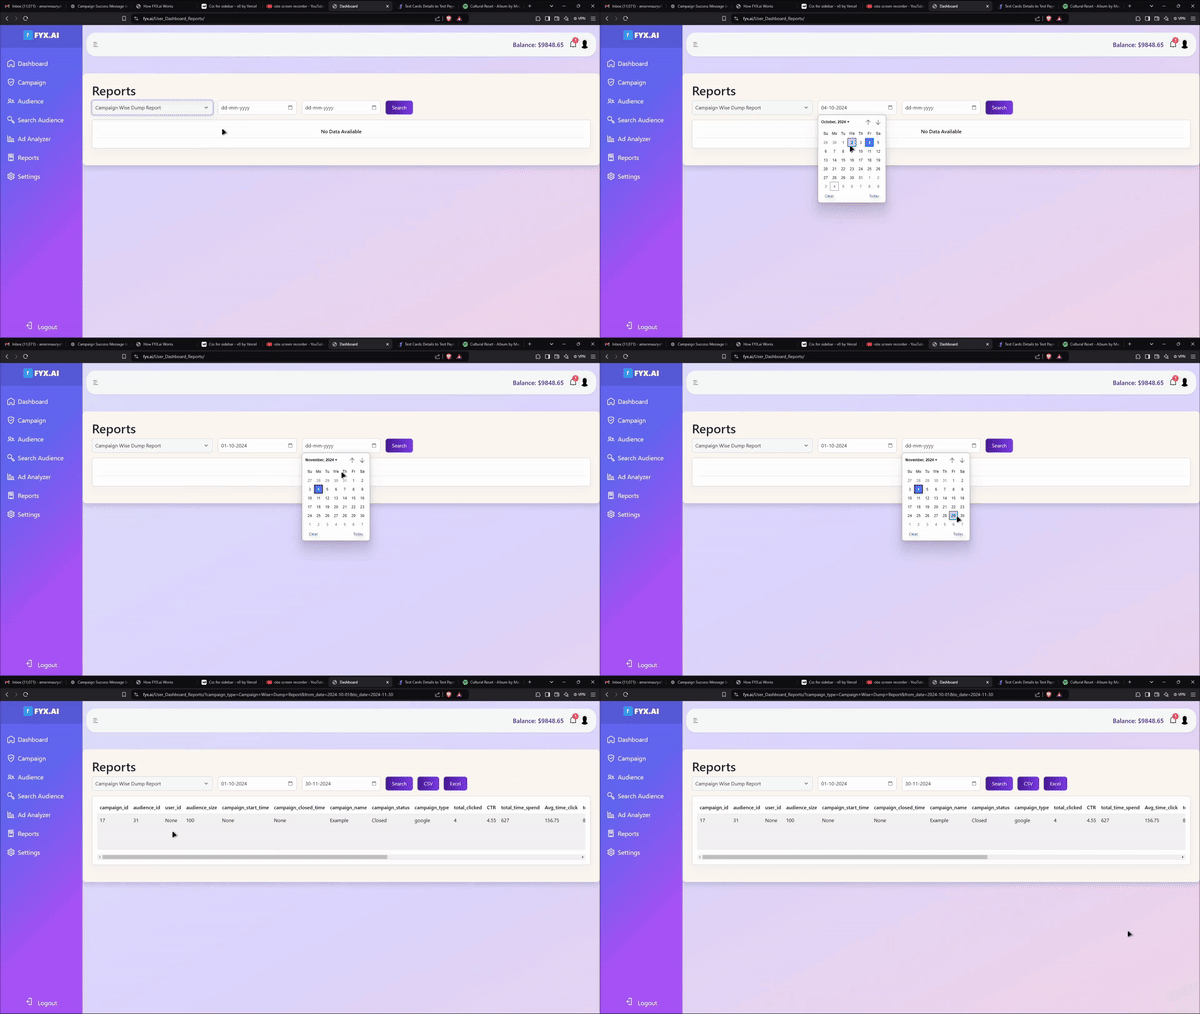
- Go to the Reports tab.
- View detailed analytics on audience reports, campaign reports, and other key performance indicators.
- Use the Filter option to search for specific data by date range, audience type, campaign status, or other criteria.
- Customize the report view by selecting data categories you want to include, such as engagement metrics, reach, conversions, or cost analysis.
- After filtering, click Apply to display the refined report results.
- For additional insights, click on a specific report to view a breakdown of metrics and detailed graphs.
- To save your data, click Download and choose the preferred format (CSV or Excel) for exporting the report.
- Review downloaded reports on your device for offline analysis or to share with team members.
- Return to the main Reports tab to adjust filters or view additional data categories as needed.
17. Settings
- Navigate to the Settings tab.
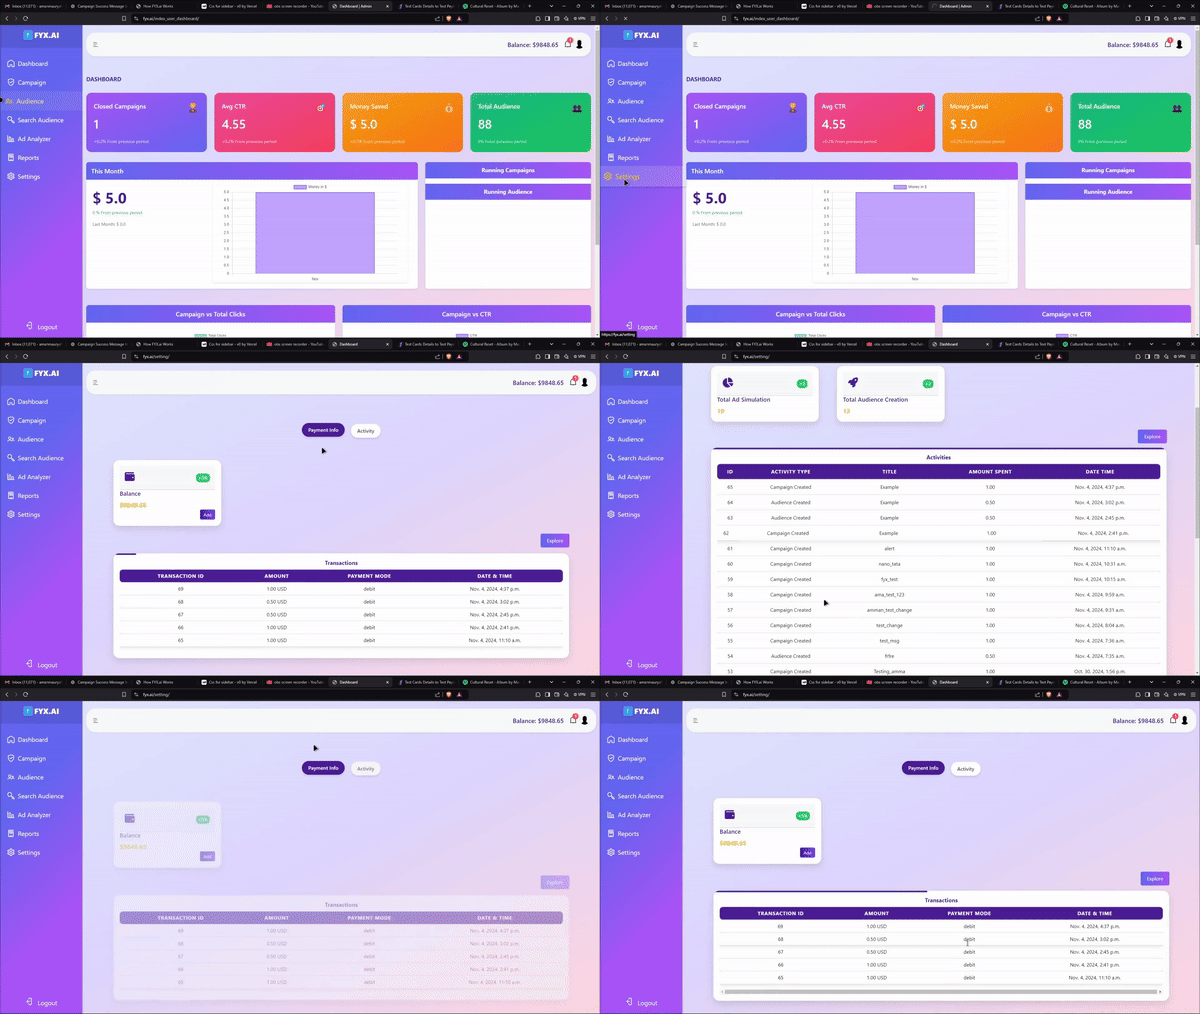
- View detailed Overall Information on payment transactions, account activity performance, and more.
- Check the Payment History section for records of all transactions, including dates, amounts, and payment methods used.
- Review your account settings, including subscription details and renewal dates, to ensure you are aware of any upcoming charges.
- To manage your payment methods, click on Payment Methods to add, remove, or update your billing information.
- You can Add Balance to your account for upcoming campaigns by clicking on the corresponding button.
- Select your preferred payment method (credit card, PayPal, etc.) and enter the amount you wish to add.
- After confirming your payment, the updated balance will reflect in your account immediately.
- Check your current balance in the Account Overview section to ensure you have sufficient funds for future campaigns.
- Return to the main dashboard to continue managing your campaigns and audience targeting as needed.
